Showing posts with label M4MM. Show all posts

Sunday, September 16, 2012

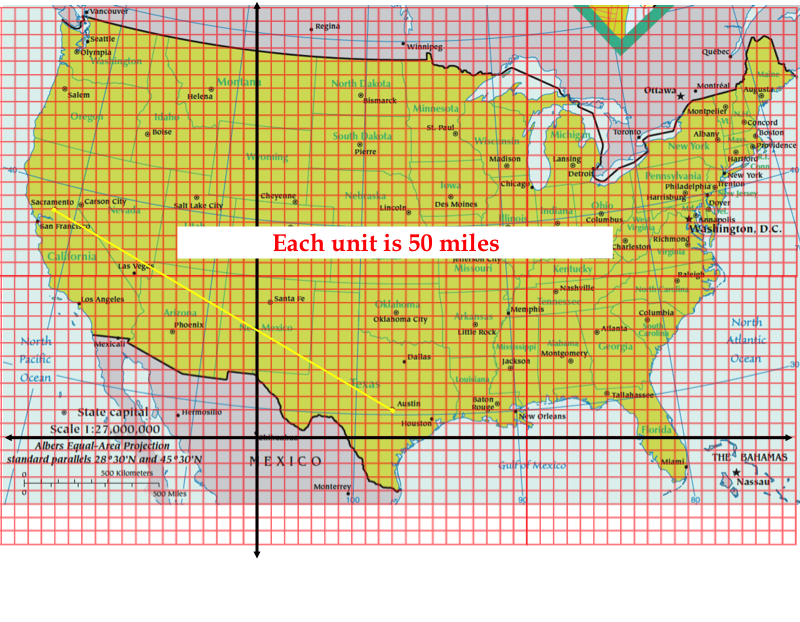
How far is Sacramento from Austin?


Distance and Midpoint Formulas (yawn)
How far is Sacramento from Austin? 


LINKS:

Link to SmartBoard Notebook file
Link to PDF
Link to this in the INB content repository I added to msmathwiki

This week I move into Distance and Midpoint formulas and wanted to have better examples than the ones in the book.  I made a SmartBoard Notebook file that helps me walk through using the formulas step by step by trying to find the distance between the two cities.  This isn't much different than the book examples except for the fact that using technology we build to the conclusion step by step.

Where are the cities on the map? (you're welcome Social Studies teachers)
How do I plot points on a map?


What does the scale mean?  How do I use it?  How else could I find the distance between these cities?


Use the grid to plot the points then remove the grid because we really don't need it anymore.  I talk about how I can put the whole map in the first quadrant to make all of the values positive if I wanted to.  In fact, I can put it anywhere.  The important fact is the relationship is the relationship between the two points.  I could move the grid and do a second example if needed.


We work through the example by plugging in the x and y values to get an approximate distance of 1,458 miles.
Since GOOGLE is the shizzle to my kids, I justify the answer online.  We're pretty close.


I also have large wall maps that are dry erase so will have the students work in groups to work out other distances and midpoints.  I really got those just to add color to that wall, but hey, a little geography in math class never hurt anyone! (I have little globes too, from my pre-calc class two tears ago)


You can see my group sized white boards in the lower center of this picture.  They are in their home made white board stand I made out of PVC pipe.  I have 12 boards there!
If you look in the back near the window, you can see the individual sized white boards in their stand.

Sunday, August 19, 2012

Fibonacci Sequence in Nature (Activity/Lesson)


First I'd like to say I am so much better when I collaborate with my Tweeps! They make me feel like I'm Ringo with The Beatles vs being Ringo without The Beatles! Thanks Tweeps!


My project this week is a SMARTBOARD activity you can use as part of a lesson on fibonacci sequence.

 This is a great way to show the Fibonacci Sequence in Nature

You can download my SMART Board file Here

You can download a handout in PDF format that explains this bee thing first Here

If you don't have a SMART Board, here'a a PDF with all the slides

First go through the way certain types of bees reproduce (read the first PDF).
  1. A male honey bee only needs an unfertilized female bee (no male bee required) parent.
  2. A female needs a fertilized female bee (requires a male and a female).


The first slide is a summary of the handout and short explanation of this process.

Next, we move to the activity.  We are going to trace the family tree of one male bee based on the information about the reproduction process. 

I created a table for placing bee graphics and a table for logging the generations.  In this case, we start with one male bee and go backward through his family tree.  This is a little bit different than my traditional fibonacci lessons.  BTW, I lost my whole folder for this topic and have to recreate it from scratch..ugh!

The two bees on the top of page 1 are set with the "infinite cloner" tool in SMART Board which means you can drag an infinite amount of copies of the images by clicking on it and dragging.  It's sort of like that thing the ice cream man used to make change.  Remember that thing?


We start with one bee, lets call him um Anthony.  When n=1, there is one bee, Anthony.  There he is in the bottom of the table.  We need to create the table by dragging the right combination of male and female bees into each previous generation.


Next we go to Anthony's parent.  He only has one since he's a male he only needs a female parent, so
when n=2, there is 1 bee.  Drag one female bee into the previous generation.


Anthony has two grandparents.  Since his mom is a female, she has both a male and a female parent.  When n=3, there are 2 bees.  Drag one female and one male bee into the previous generation.


One grandparent is a female and the other is a male.  The female has both a male and a female parent.  The male has only a female parent. When n=3, there are 2 bees.


I hope you get the idea by now.


The beauty of using the SMART Board for this activity here is that it allows students to make mistakes and correct them easily because they can move the pieces around, delete or add more if needed.
 
As @fnoschese points out in this post, the SMART Board in not necessarily the only way or the best way to have all of your students interact with learning.

@bowmanimal sold me on whiteboarding and on using larger group sized whiteboards at #TMC12.  Also @approx_normal and @calcdave contributed recently to my decision to acquire 32" x 24" whiteboards for my classes.

This fibonacci honey bee activity could also be done by small groups using their whiteboards.  I will have my classes use their whiteboards and multicolored markers to make their own version.  

I could also see this activity being done using the actual students setting themselves up as male and female bees.  So I see at least three ways to do this activity is a fun/cool way.


Ways to do this activity:
1. SMART Board
2. Whiteboards
3. Student lineup (boy | girl | B+G | G+B+G | G+B+G+B+G | etc...)
4. Make a deck of cards with male & female bees on them.

Oh!  Here is the link to the SMART Board file again.  :-)

Sunday, July 29, 2012

Two M4MM Projects


I have two M4MM projects to share today:

1. Lightweight foldable whiteboard made from a foam board presentation thingy and "dry erase" contact paper.
2. Display stand/holder for whiteboard, blackboard, whatever.

WHITEBOARD (Project #1):

  • I purchased the foam presentation board and dry erase Con-tact paper at different stores.  The dry erase paper is hard to find!  I found it at Beckers in Watchung, NJ (Route 22).
  • Simply cut and attach the paper to the board.  Although I goofed up a couple times so my board is not perfect.  The Con-tact paper will attach permanently to the foam board so removing air bubbles is almost impossible.  
  • If I were to do this project again, I would not use the foam board.  It was very difficult to get it covered properly.

STAND MADE FROM 1" PVC PIPE (Project #2):

I bought all the supplies I needed at Home Depot.  Total cost, about $25.  This doesn't include the spray paint I used, so about $30.

1" PVC Pipe and Fittings

No, it's not going to be a marshmallow shooter!

Finished Frame/Stand
Finished Frame/Stand with whiteboard
It's pretty light and pretty strong!  I left some of the pieces unglued so I can change it if I need to.  This was my first attempt and I am sure I'll need to change it.

Finished: Before paint
Finished: Being painted


I took video as I made this thing.